Do you ever wonder how people does snow effects in Photoshop? Well here is a Tutorial for you guys to start of the winter. This tutorial is about how to make a metallic text with snow lying on it. Follow 8 easy steps below!
STEP:1 - Creating a new page.
Open your Photoshop and make a new page with the following specifications like on the picture:
- Width: 800 - Height: 400 - Resolution: 150 - Name the document SnowyText.
STEP:2 - Creating a new layer.
Now make a new layer in the layer tab and rename it mybackground.
Okay, now that everything is set up lets get started!
STEP:3 - Selecting open space
Start by using your Rectangular Marquee Tool (Shortcut - M) click and drag it all over your new clean page. N.B! Make sure you are on the mybackground Layer!
STEP:4 - Adding color.
Now that you have selected the entire clean space take your Paint Bucket Tool
(Shortcut - G) and go to your color picker and choose a light blue color (# 71afe6).
After choosing your color click with the Paint Bucket Tool onto the selected area.
AGAIN! Make sure you are on the mybackground Layer while doing this!
*Select the Rectangular Marquee Tool again and right click and select deselect.
STEP:5 - Adding text.
Now we need to add text and make it metallic. Choose the Type Tool
(Shortcut - T) and click anywhere on the page and type Snowy. You will notice that on your layer tab a new layer pops up. When adding a text Photoshop creates a new layer.
Use the following specifications:
- Font: Helvetica - Style: Bold - Size: 60pt - Color: # e8e8e8 (white/grey color)
STEP:6 - Making text look like metal.
Now we want to make the text have a metallic effect. Double click the Snowy layer which has the text on. A Layer Style window will pop up where you can create an effect/style.
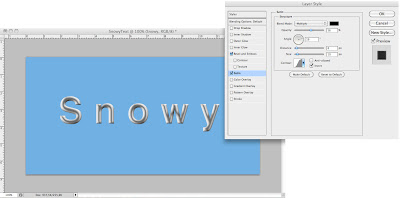
+ 1st we want to make the text looks realistic (meaning 3D) so we have to select the Bevel and Emboss tab on the left hand side. Use the following specifications:
- Size: 5 - Soften: 2 - Angle: 120 - Altitude: 30 - Shadow mode > opacity: 50%
+ 2nd we are going to add the metal effect by selecting the Satin tab. Use the following specifications:
- Opacity: 56% - Angle: 19 - Distance: 8 - Size: 10

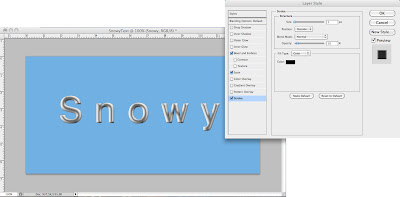
+ 3rd we need to add a stroke to give the text a feeling of depth. Use the following specifications:
- Size: 1 - Opacity: 10%

STEP:7 - Setting up Snow Layer.
Okay now we have a nice metallic text. We now need to set up the layer for the snow. It is very easy, first make a new layer (ALWAYS work on new layers for safety purposes) and rename it Snow.
Double click the Snow layer and the Layer Style window will pop up again. We want to add an inner glow and bevel and emboss style to make the snow look realistic.
On the Inner Glow tab use the following specifications:
- Opacity: 65% - Choose the first color and make it black - Choice: 0% - Size: 2
On the Bevel and Emboss tab use the following specifications:
- Depth: 100% - Size: 1 - Soften: 4 - Angle: 120 - Altitude: 30
STEP:8 - Applying the snow style.
After the set up of the snow layer you need to actually draw the snow now by hand. Select your Brush Tool (Shortcut - B) and choose the second brush (Hard round brush) and make it's size 10 px.
Take the brush tool and make sure that you are on the Snow layer. Start off by making your brush smaller and bigger to the size that is suitable for you. Start smudging the brush over parts of the text that you feel the snow should lie on. As you can see, it is very easy and it goes quick when you get into the smudging mood!
So, I hope this tutorial was helpful! Check in for more tutorials! Please rate and leave comments if necessary.
Till Later!
*F


